Pixel Art to SVG: How to Keep the Hard Edges
You drew a sprite, an icon or a game character on a tiny grid and now you want it as an SVG. Maybe for a sticker, a laser cut, a shirt or a site header. You trace it and the square pixels come back as soft, rounded lumps. The fix is not in the tracer settings. It is in how the small image gets enlarged before it is traced.
Why pixel art goes soft
A tracer looks for edges between colors. Pixel art has a perfect edge between every block, but only if the pixels are still sharp when the tracer sees them.
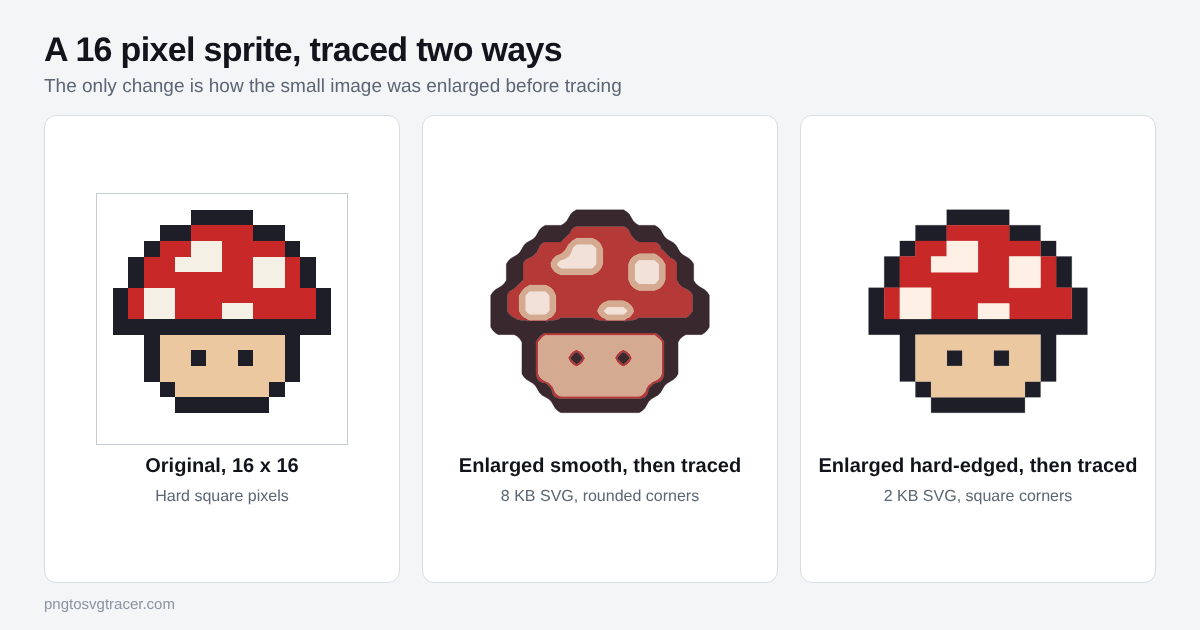
Our tool enlarges very small images before tracing so curves have enough pixels to follow. The browser does that with smoothing, which blends neighboring pixels. On a 16 pixel sprite that turns every hard step into a gradient, and the tracer draws curves around it. That is the middle result in the figure.
If you enlarge the image yourself with a hard-edged method first, every pixel becomes a solid block, and the trace follows the square outlines exactly. That is the right-hand result.
Step 1: Enlarge it by a whole number
You need an editor that has a "nearest neighbor" or "no interpolation" resize. Aseprite, Photoshop, GIMP, Krita and Paint.NET all have one. Many pixel art tools have an export scale option too.
- Resize with nearest neighbor. Not bilinear, not bicubic, not "smooth".
- Use a whole number multiple: 10x, 20x, 40x. A 16 pixel sprite at 40x is 640 pixels wide. A fractional scale like 7.5x gives some blocks more pixels than others and your shapes come out uneven.
- Aim for at least 600 pixels on the long side, so the tool does not enlarge it again with smoothing.
- Save as PNG. Do not save as JPG, which adds fuzzy halos around every block.
Step 2: Trace it
Open the image to SVG tool and drop in the enlarged PNG. If your source is a GIF, the GIF to SVG tool does the same job. An animated GIF traces only its first frame, so export the frame you want as a PNG if it is not the first one.
Leave the style on Logo or icon (few colors). Then set:
- Colors: the exact number of colors in your palette. The sprite in the figure uses four plus transparency, so Colors 4. Too few and two colors merge. Too many and the tool starts inventing in-between colors.
- Soften: 0. Blurring is the opposite of what you want here.
- Smoothing: leave it at 1. On blocky art the curves have nothing to round, so it changes very little.
- Remove small specks: low, around 4. A single pixel is a real feature in pixel art, like an eye or a highlight. A high value can drop it.
Step 3: Check the result
Zoom in and look at three things:
- Corners should be square, not rounded.
- Single-pixel details such as eyes and sparkles should still be there.
- The area around the sprite should be empty. Transparent PNG areas stay empty in the SVG. If your art sits on a white square, tick Make white background transparent. The transparent background guide covers the details.
What you get, and what to expect
Each color becomes one or more filled shapes, and joined blocks of the same color merge into a single outline. So you get a clean file, not a grid of thousands of tiny squares. In our test, a 16 by 16 sprite came out at about 2 KB.
A few honest limits:
- The tracer picks its own number of points. It will not give you one square per original pixel, so you cannot edit "pixel 5, row 3" in your vector editor.
- Dithering patterns, such as checkerboard shading, trace into many small shapes. Redraw dithered areas as flat color if you can.
- Gradients and anti-aliased art are not pixel art in this sense. Blurry edges trace as curves, as they should.
Where to use it
An SVG sprite stays crisp at any size. If the file is heavier than you want, see how to make an SVG file smaller. If the trace still looks off in some other way, the symptom list in why your SVG trace looks jagged or lumpy is the next place to look.
Quick reference
| Problem | Change |
|---|---|
| Rounded, blobby corners | Enlarge with nearest neighbor first, then trace |
| Uneven blocks | Use a whole number scale such as 10x or 20x |
| Missing eyes or single pixels | Lower Remove small specks |
| Extra in-between colors | Set Colors to your real palette size |
| Fuzzy edges from a JPG | Start again from the PNG, not the JPG |
| White box behind the sprite | Tick Make white background transparent |
Related tools
Keep reading
- TroubleshootingWhy Your SVG Trace Looks Jagged or Lumpy, and How to Fix ItWobbly curves, broken thin lines and noisy edges all have a cause. Here is what to change in a trace, setting by setting, to get a clean SVG.November 5, 2026 · 3 min read
- TutorialsHow to Make a Transparent Background SVG from a PNGTurn a PNG or JPG logo into an SVG with no white box behind it. Which setting to use, how to check it worked, and what to do when a pale background stays.October 20, 2026 · 4 min read
- TroubleshootingHow to Make an SVG File Smaller: Fewer Points, Same LookTraced SVGs can get huge. Learn which settings shrink the file the most, what to remove, and how small a clean logo SVG should really be.October 12, 2026 · 2 min read