Screen Printing Separations: Prepare Artwork from a PNG
A screen printer asks for "separations" and all you have is a PNG. A separation is one black-and-white layer per ink color. Each layer becomes one screen. A clean trace gets you most of the way to those layers, and this post covers the part you can do before you talk to the shop.
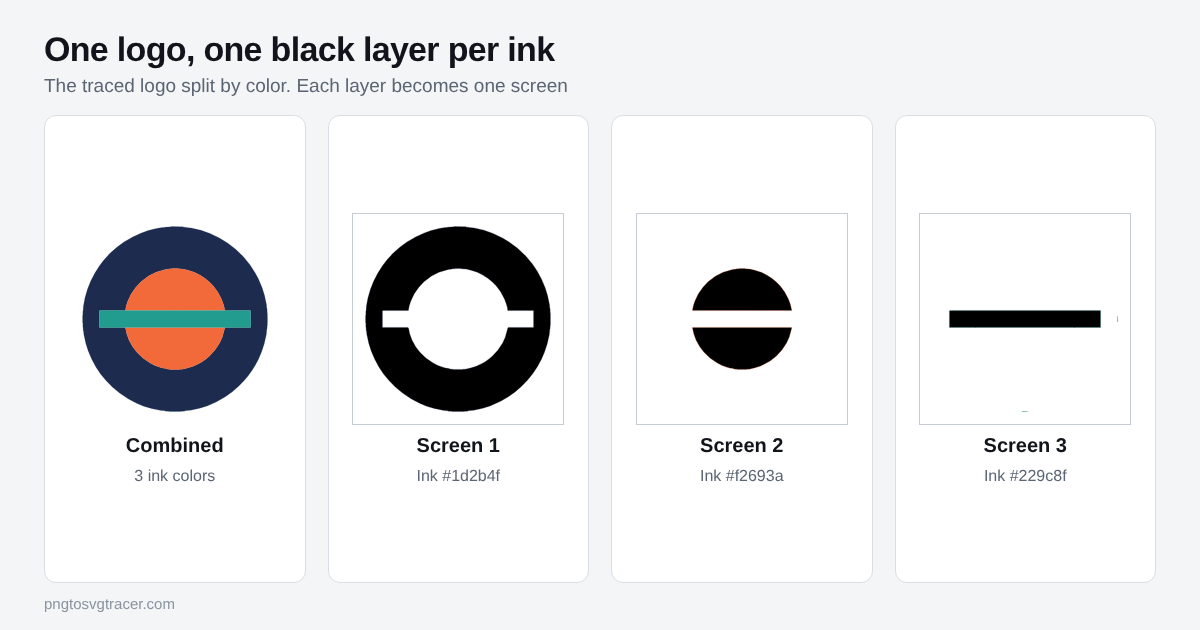
What a separation is
Screen printing pushes one ink through one stencil at a time. A logo with a navy ring, an orange circle and a teal bar needs three stencils, printed one after another. Each stencil is made from a layer where the area to print is solid black and everything else is empty.
So the artwork has to be split by color, and every color has to be a clean flat shape. Soft edges and in-between shades are a problem, because a stencil is either open or closed. There is no half-open.
Why a trace helps
A PNG logo is made of pixels, and the edges are blended shades. A tracer turns each color area into one smooth shape with a hard edge. That is what a separation needs. The source can be small, but the bigger and cleaner it is, the better the edges come out.
Be clear on the limits. This tool traces to SVG. It does not make separations for you, it does not add registration marks, and it does not handle halftones or gradients. A gradient comes out as flat bands, so a logo that depends on one needs rebuilding by hand.
Steps
- Find the largest, cleanest copy of the logo. A PNG beats a JPG.
- Open the logo to SVG converter and drop the file in.
- Set Style to Logo or icon.
- Set Colors to the number of inks you plan to print. Count solid colors only. White paper or a white shirt is not an ink, so leave Make white background transparent ticked.
- Raise Remove small specks and Soften a little if you see fuzz around the edges. The settings are explained in how to fix a jagged trace.
- Check the preview against the original. Look at thin lines and small letters.
- Look at the color list in the editor under the preview. You should see one fill per ink. If two shades are really the same ink, lower the Colors setting and trace again.
- Download the SVG.
Splitting it into layers
Each color area in the SVG is a shape with its own fill. In a vector editor such as Inkscape or Illustrator, select every shape with the same fill, copy them to their own layer, and set the fill to black. Do that once per color. You end up with one black layer per screen, like the three on the right in the picture above.
Many printers would rather do this step themselves, in their own software, because they know how their screens and inks behave. Ask first. Sending the traced SVG along with the original PNG is often enough.
What the printer still has to handle
Trapping. If two inks touch exactly, a small shift in registration leaves a thin gap of bare shirt. Printers fix this by letting one color overlap its neighbor slightly. The trace does not add that overlap, so the adjustment still has to be made. Your printer knows the amount that suits their press.
Underbase. On dark shirts, a white layer is usually printed first so the colors stay bright. The printer normally adds this. It is not something your trace creates.
Size and line weight. Very thin lines and tiny text can fill in or break up on the screen. If your logo has hairlines, ask the shop for their minimum line weight before you finalize anything.
Color matching. The hex values in the SVG come from your PNG. They are a guide. Printers match ink to a swatch system, so tell them which colors you want and do not rely on the file alone.
A quick check
Zoom to several hundred percent. Each color should be one smooth shape, with no specks floating around it. Look for tiny stray bits near the edges of each layer, like the faint marks on the second and third layers in the figure. Stray bits like that can print as dots, so remove them or raise the specks setting.
If the shop also does stitching, the same artwork prep applies, with a few extra rules about thread. See how to vectorize a logo for embroidery digitizing. Not sure screen printing is the right method? Sublimation vs DTF vs screen print shows what artwork each one needs. For the wider picture of why shops ask for vectors at all, read why printers and sign shops ask for a vector logo.
Related tools
Keep reading
- GuidesWhy Printers and Sign Shops Ask for a Vector LogoScreen printers, embroiderers and sign makers ask for vector logos. Learn why, which formats they accept, and how to get one from a PNG or JPG.November 3, 2026 · 2 min read
- GuidesHow to Vectorize a Logo for Embroidery DigitizingPrepare a clean SVG from a PNG or JPG logo before you send it to an embroidery digitizer. Color count, small text, and what the file can and cannot do.October 22, 2026 · 3 min read
- TroubleshootingWhy Your SVG Trace Looks Jagged or Lumpy, and How to Fix ItWobbly curves, broken thin lines and noisy edges all have a cause. Here is what to change in a trace, setting by setting, to get a clean SVG.November 5, 2026 · 3 min read