Best Settings for Tracing a JPG Logo into a Clean SVG
Most logos you find are JPGs, and JPGs are the hardest common format to trace. The compression smears a faint halo around every edge, and a tracer reads that halo as real detail. Four settings fix most of it. Change them in the order below.
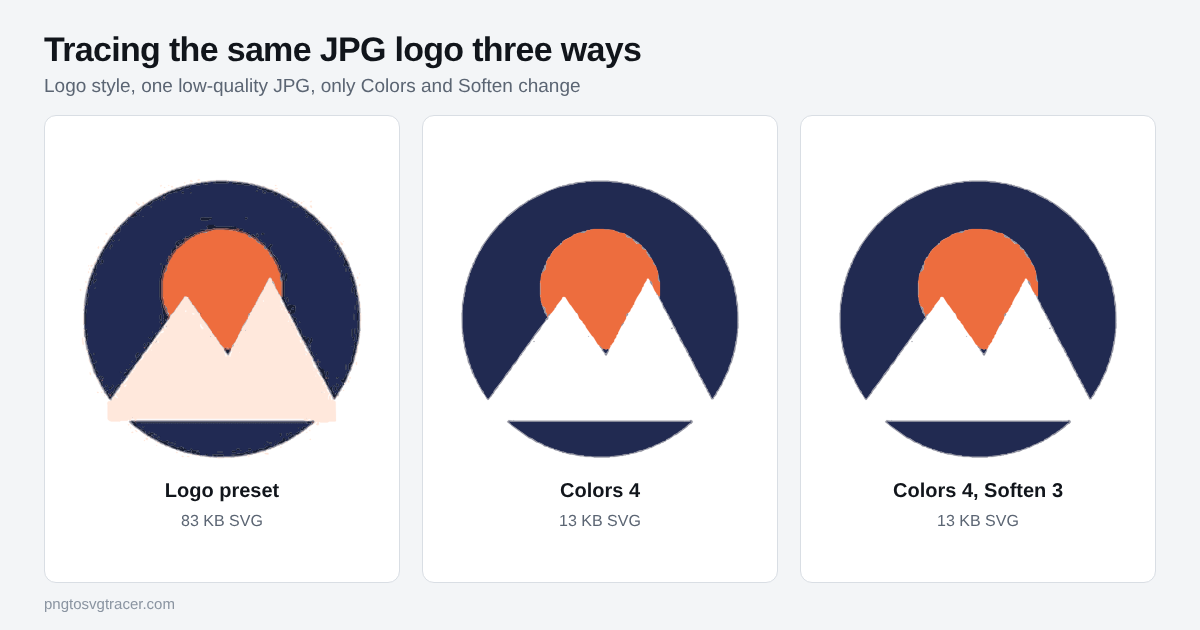
Start with the Logo style
Open the JPG to SVG tool and drop in your file. Pick Logo or icon (few colors). It starts at 8 colors, Smoothing 1, Remove small specks 8 and Soften 0. That is a fine base for a clean JPG. For a rough one, keep going.
1. Lower the color count to match the logo
This is the biggest lever, and most people skip it. Count the flat colors in your logo, including the background if you want it kept. Set Colors to that number.
In the figure above, the logo has three colors plus white. At the 8-color preset, the tracer found extra in-between colors in the halo and drew a pale peach shape where the white mountain should be. The file came out at 83 KB. At 4 colors the same JPG traced to 13 KB with the right shapes.
If you are not sure how many colors you have, start at 4 and raise it by one until nothing important is missing.
2. Raise Soften for blurry or blocky edges
Soften blurs the image slightly before tracing, which melts the halo into the edge. Try 2 or 3. It runs from 0 to 5.
On a sharp JPG with few colors, you may not see much change, and that is fine. It matters more when the logo is small, heavily compressed or has thin letters. Do not push it to 5 unless the source is really rough, because high values round off sharp corners.
3. Raise Remove small specks for stray dots
If you see tiny dots or crumbs around the edges, raise Remove small specks from 8 to 14 or so. It drops tiny shapes before they reach your file. If thin parts of your logo start disappearing, you went too far, so back it off.
4. Leave Smoothing alone until last
Smoothing controls how many points the curves use. At 1, most logos are fine. Raise it to 1.4 if curves look bumpy. Lower it if your corners look rounded. It does not clean noise, so do not use it for that.
Check before you download
Drag the comparison slider across the preview and look at three places: the thinnest letter, a sharp corner and the area right around the edge. If all three look right, download. If the background is still a white box, tick Make white background transparent. The transparent background guide covers the cases where that is not enough.
When settings will not save it
Settings cannot add pixels that are not there. If a logo is under about 200 pixels wide, or the JPG is so compressed that letters are blocky, look for a better source first. Check the company website, an old email signature, or a PDF of the brand sheet. A larger or PNG copy will beat any setting.
Saved as WebP instead?
Lossy WebP files have the same halo problem as JPG, and the same four settings fix it. If the logo you saved from a website ended in .webp, follow the WebP logo guide.
Quick reference
| Problem | Change |
|---|---|
| Extra shapes and a heavy file | Lower Colors |
| Wobbly edges, halo | Raise Soften to 2 or 3 |
| Dots and crumbs | Raise Remove small specks |
| Bumpy curves | Raise Smoothing a little |
| Rounded corners | Lower Smoothing or Soften |
| White box behind the logo | Tick Make white background transparent |
If the trace still looks off after these, the jagged trace troubleshooting guide goes through each symptom. Once it looks right, shrink the file if you plan to use it on a website.
Related tools
Keep reading
- TroubleshootingWhy Your SVG Trace Looks Jagged or Lumpy, and How to Fix ItWobbly curves, broken thin lines and noisy edges all have a cause. Here is what to change in a trace, setting by setting, to get a clean SVG.November 5, 2026 · 3 min read
- TutorialsHow to Make a Transparent Background SVG from a PNGTurn a PNG or JPG logo into an SVG with no white box behind it. Which setting to use, how to check it worked, and what to do when a pale background stays.October 20, 2026 · 4 min read
- TutorialsWebP to SVG: What to Do With Logos Saved From WebsitesSaved a logo from a website and got a WebP your design software will not open? Here is how to turn it into a clean SVG, and which settings matter.October 28, 2026 · 4 min read