Why SVG Text Disappears in a DXF (and How to Fix It)
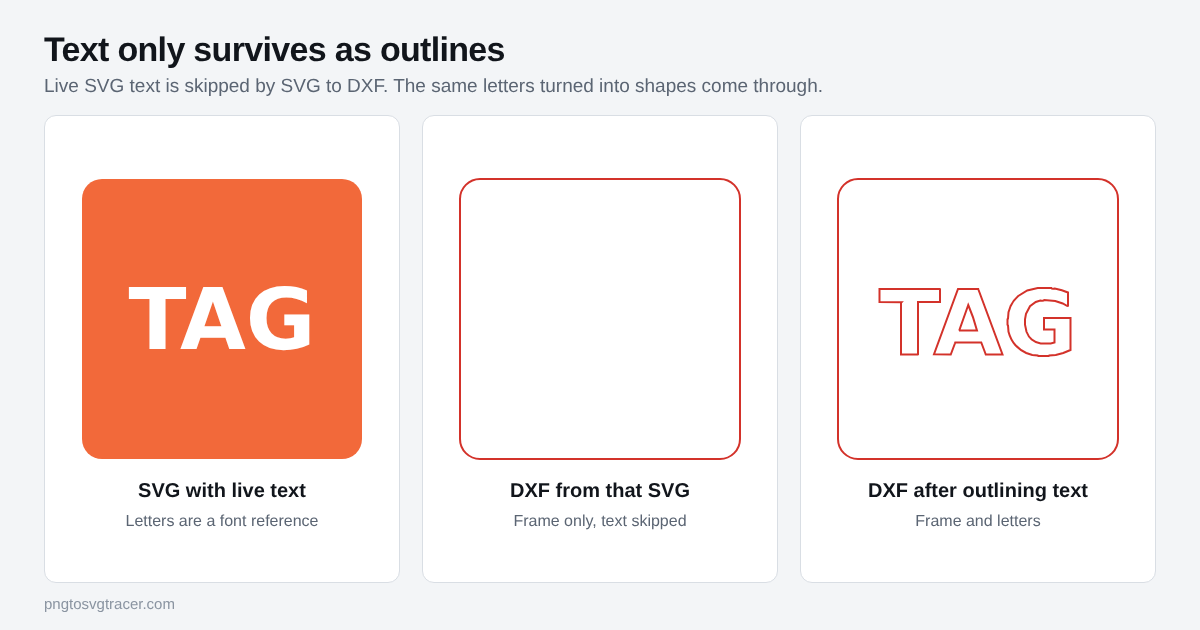
You converted an SVG to a DXF, opened it in your cutting software, and the shape is there but the name, number or slogan is gone. Nothing broke. The text was never shape data to begin with.
Why the text goes missing
In an SVG, a line of text is not a drawing of letters. It is a short instruction: this word, this font, this size, here. Your browser or design program looks up the font and draws the letters on the spot.
A DXF holds outlines, and nothing else. There is no font in it to look up. To put letters in a DXF, something has to first turn them into shapes. SVG to DXF on this site reads shapes and paths. When it meets a text element, it skips it and tells you so with a note: "Text was skipped."
It is the same story for linked shapes (use elements) and embedded images. Both are skipped, and the tool says so.
The fix: turn text into outlines first
Outlining converts each letter into a closed shape. After that the text is just more paths, and it converts like everything else. Do this in your design program, then export the SVG again.
Inkscape. Select the text, then choose Path, then Object to Path. If the text is one object, you now have a group of letter shapes. Save as a plain SVG. If you are new to the program, open and edit an SVG in Inkscape covers the basics.
Illustrator. Select the text, then choose Type, then Create Outlines. Export as SVG.
Figma. Select the text layer, then choose Object, then Flatten. Export the frame as SVG.
Menu names shift between versions, so if you do not see them, search the program's help for "convert text to outlines" or "text to path".
Then convert and check
- Open SVG to DXF and add the new SVG.
- Choose to keep the file's own size, or scale to a width in millimeters.
- Look at the preview. The letters should show as outlines.
- If the "Text was skipped" note still appears, some text is still live. Look for a hidden layer, a text object inside a group, or a second line you missed.
- Download the DXF and measure something in your software before cutting.
Small letters and holes
Outlined letters with holes, like A, B, O and R, convert as outlines with an inner outline for the hole. In a cutter, that inner piece is the part that drops out, so a stencil or a cut-through sign may need bridges. For stencil fonts, the gaps are already built in. Test on scrap before you commit material.
Thin strokes are the other trap. A hairline font can be narrower than your laser kerf or your bit. Pick a bold weight, or thicken the outline in your editor before converting.
What if you only have an image of the text?
If the lettering exists only as a PNG or JPG, such as a logo or a scan, you can skip the SVG step. PNG to DXF traces the image straight into outlines at the width you enter in millimeters. Use a high-contrast image and raise Remove small specks so stray dots do not become cut paths. The same method works on photos of handwriting, covered in handwritten notes as SVG for engraving.
The short version
Live text is a font reference, and a DXF cannot hold one. Convert the text to outlines, export the SVG again, then run it through the converter. For the bigger picture on when to use each format, see SVG vs DXF and SVG for laser engraving.
Related tools
Keep reading
- ComparisonsSVG vs DXF: Which File Your Laser or CNC WantsSVG or DXF for your laser or CNC? What each file holds, when size in millimeters matters, and how to get either one from a PNG or JPG.October 30, 2026 · 3 min read
- Maker workflowsSVG for Laser Engraving: Prepare Files from a PNG or JPGHow to turn an image into an SVG or DXF for laser engraving and cutting, which format your software wants, and how to avoid size and line problems.October 31, 2026 · 2 min read
- TutorialsHow to Open and Edit an SVG in Inkscape (Free)Trace a PNG or JPG to SVG, open it in free Inkscape, then recolor shapes, delete a background, merge pieces and save a clean file. Step by step.October 29, 2026 · 4 min read