Vectorizing a Scanned Drawing: Scanning Tips That Help
A scan is the best starting point for tracing a drawing. It is flat, evenly lit and sharp, which a phone photo rarely is. But a bad scan still traces badly, and most of the fixes happen at the scanner, not in the tracer.
Set up the scan before you press the button
Scan in color or grayscale, not black and white. The scanner's own black and white mode throws away detail before you ever see it, and you cannot get it back. Scan in color or grayscale and let the tracer make the black and white decision.
Use 300 dpi for most drawings. Go to 600 dpi for small or very fine work, such as a drawing that is only a few inches wide. Higher than that mostly gives you a bigger file, not a better trace.
Save as PNG. A PNG does not add compression noise. If your scanner only gives you JPG, use the highest quality setting. The tracer takes PNG, JPG, WebP, GIF and BMP.
Turn off automatic fixes. Auto contrast, descreen and sharpen filters can add halos and texture around lines. Plain and unprocessed is what you want.
Get the page flat
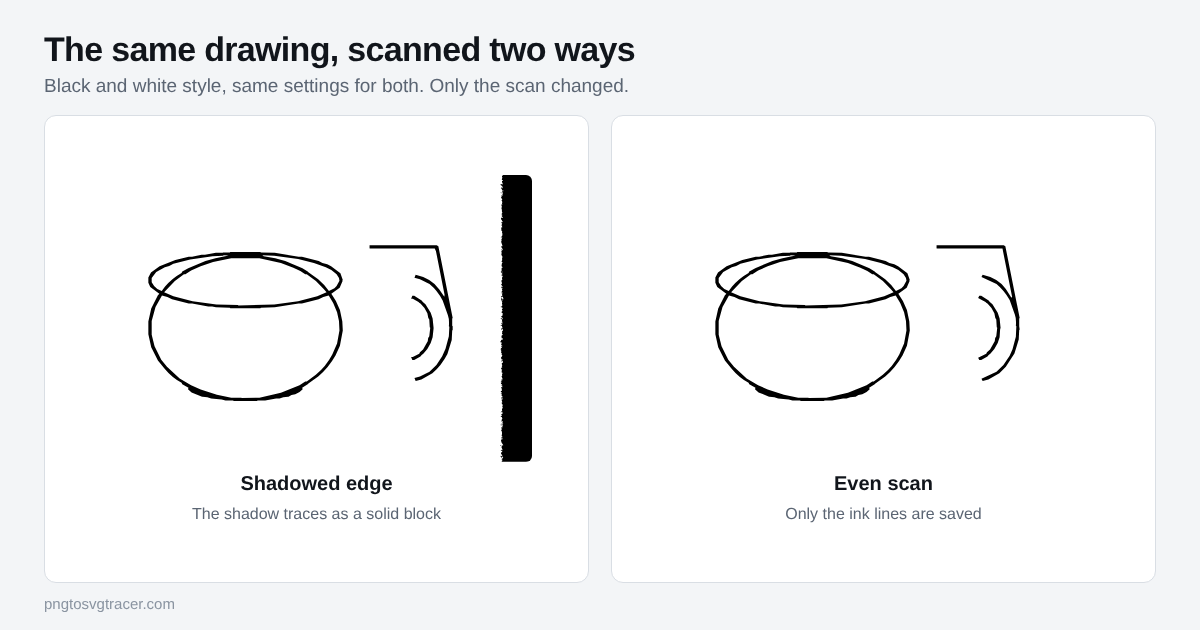
Anything that lifts off the glass makes a shadow, and a shadow is the number one cause of a bad scan trace.
- Clean the glass with a dry cloth. Dust becomes specks.
- Close the lid fully. A propped lid lets light in and tints the paper.
- For a sketchbook, scan the page flat and keep the spine out of the picture if you can. A bound edge curves away from the glass and goes dark.
- Leave a small margin of blank paper around the drawing so you can crop cleanly.
In the picture above, the left trace has a solid block because the scan had a dark edge. The tracer sees a dark area and saves it as a dark shape, just like it would a line. The settings were identical in both traces.
Crop and straighten first
Crop to the drawing with a thin margin. Rotate the page if it is crooked. Do this in any image editor, or in your scanner software, before you trace. Tracing a straight, cropped image also means a smaller SVG with fewer stray shapes near the edges.
Trace it
- Open the image tracer and drop in your scan.
- Choose Black and white shapes for ink drawings and line art.
- Move the Threshold until the thin lines are complete but the paper has not started to appear. For dark ink on clean paper the default of 128 is often fine. Pencil and light pen need a higher value, as covered in how to trace a pencil sketch.
- Raise Remove small specks a few steps to clear dust and grain.
- Raise Smoothing if the lines look shaky. If they look jagged instead, this fix for jagged traces shows what to change.
- Download the SVG.
Colored drawings are different. Use a color style and a low number of colors, then check the preview. A watercolor or heavily shaded drawing will become flat shapes, because a trace does not keep soft gradients.
What to check in the preview
- A dark block along one edge. That is a shadow. Rescan with the lid fully closed, or crop it off.
- Gray speckle across the paper. The threshold is too high, or the paper has texture. Lower it a little, or raise Remove small specks.
- Lines with gaps. The threshold is too low for your lightest strokes. Raise it.
- Thick, rounded blobs where thin lines meet. The scan was too low in resolution. Rescan at a higher dpi.
When the scan cannot be fixed
If the original is faded, creased or stained, the scan will carry all of it. You have two choices. Raise the threshold and accept some loss, or trace the cleanest parts and redraw the rest as vector shapes in an editor. The first is faster. The second gives a better result for a drawing you will use many times.
Bold ink or fine lines?
Heavy ink lines survive almost any scan. Hairlines and light pencil do not, so scan those at a higher dpi and expect to raise the Threshold. For a worked example with bold line art, see tattoo flash to SVG.
Using the file
A traced scan is one color, so you can recolor it in one step in an editor such as Inkscape. Check the SVG over a colored shape before you use it, to make sure there is no white box behind the lines. If you plan to cut it, a drawing made of thin lines turns into thin, fragile cut shapes, so test a small piece first. The SVG tracer page covers the options in more detail.
If the drawing is someone else's work, make sure you have the right to reproduce it before you trace it.
TagsSVGTracingScanningHandwriting
Related tools
Keep reading
- TutorialsHow to Trace a Pencil Sketch into an SVGTurn a pencil sketch into a clean SVG line drawing. How to photograph it, set the threshold for light graphite, and fix gray paper, smudges and broken lines.October 25, 2026 · 4 min read
- TroubleshootingWhy Your SVG Trace Looks Jagged or Lumpy, and How to Fix ItWobbly curves, broken thin lines and noisy edges all have a cause. Here is what to change in a trace, setting by setting, to get a clean SVG.November 5, 2026 · 3 min read
- TutorialsTattoo Flash and Line Art to SVG: How to Trace It CleanlyTurn tattoo flash, sketches and bold line art into a clean SVG. How to prep the sheet, set the threshold, keep thin lines, and check the result at stencil size.November 2, 2026 · 4 min read