Vinyl Cutting a Two-Color Decal from a PNG
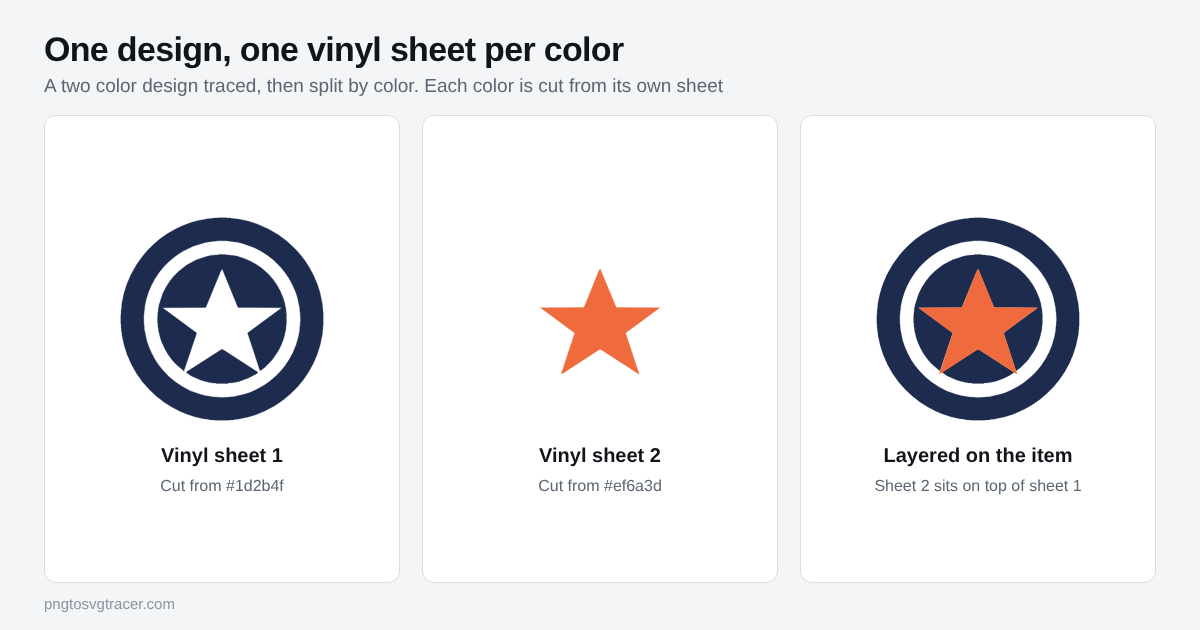
A two-color decal means two sheets of vinyl, cut separately and stacked on the item. Your artwork is probably one PNG. The job is to trace it, split it by color, and make sure the pieces line up when you press them down.
Check the PNG first
Two colors is the easy case, so keep it that way. Use the biggest copy you have. Solid colors on a plain background trace best. If the PNG has a shadow, a glow or a gradient, the trace will turn those into extra shapes, and each one is more weeding for you.
If the design has a third color you could live without, drop it. Every added color is another sheet, another cut and another layer to line up.
Trace it with two colors
- Open the logo to SVG converter and drop in the PNG.
- Set Style to Logo or icon.
- Set Colors to 2. If the white background shows up as a shape, tick Make white background transparent. You do not want a white box, because you would be cutting a sheet of vinyl for it.
- Raise Remove small specks until stray dots disappear. Specks are a real cost in vinyl. Each one is a tiny cut that you have to weed out by hand.
- Raise Smoothing a little if curves look lumpy. Raise Soften first if the PNG started out as a fuzzy JPG. How to fix a jagged trace explains both.
- Compare the preview with the original. Look at thin lines and small gaps between the two colors.
- Download the SVG.
Count the colors in the editor under the preview. You want your two vinyl colors and nothing else. If a third shade shows up, it is usually an anti-aliased edge or a leftover from the background. Lower Colors or raise the specks setting and trace again.
Get one layer per color
In Cricut Design Space, upload the SVG and look at the layers panel. Each color should appear as its own item. Hide one color and the other should stay. If both colors came in as a single item, open the SVG in a vector editor, select the shapes with each fill, and save them as separate layers.
Then set the colors in Design Space to match the vinyl you own. The colors in the SVG only tell the software which shapes go together. They do not have to match your rolls.
If you have a plain one-color design, use the SVG for Cricut page with the Black and white style instead. It is simpler and the file is smaller.
Decide how the layers will overlap
This is the part that trips people up. In the picture, the navy sheet has a star-shaped hole and the orange star fills it. That works only if the two cuts line up almost perfectly. A small shift leaves a gap or an overlap.
There are two common ways to avoid that:
- Overlap on purpose. Keep the navy sheet solid, with no hole, and place the orange star on top of it. Nothing needs to line up edge to edge, so a small shift does not show.
- Keep the hole. Cut the hole, and make the orange piece a little bigger than the hole so it overlaps the edge. This takes more work and looks cleaner when the layers line up.
For a first decal, use the overlap method. The trace does not add the overlap for you, so you make it in Design Space or in your vector editor.
Line the layers up when you apply them
Cut both sheets. Weed each one. Put transfer tape on the first layer and apply it. Then put tape on the second layer and press it into place. Hold it up to the light first if you can, or mark the corners of the first layer with a small piece of tape as a guide.
Some people cut a thin box around each layer, the same size on both sheets, so the two boxes line up as a guide. That is a trick you do in Design Space, not something the tracer makes.
Test before you cut the good vinyl
Cut a small version on scrap first. Look at three things:
- Can you weed the smallest piece without it tearing?
- Do the two layers sit together the way the preview shows?
- Are any lines so thin that they lift when the tape comes off?
Thin parts are the usual problem. If something lifts, go back to the PNG and thicken it, or trace with a slightly lower threshold if you used the black and white style.
What this will not do
The tool traces the picture you give it. It does not rebuild a missing design, does not add registration marks and does not make gradients. A soft color fade is flattened into solid shapes, which is fine for vinyl, since vinyl is solid anyway.
For the single-color version of this job, read how to convert a logo to SVG for Cricut. If you are splitting a design by color for another process, the same idea applies to screen printing separations.
Related tools
Keep reading
- TutorialsHow to Convert a Logo to SVG for Cricut Design SpaceTurn a PNG or JPG logo into an SVG that Cricut Design Space can cut. Which style to pick, how many colors to keep, and what to check before you cut.November 4, 2026 · 4 min read
- GuidesScreen Printing Separations: Prepare Artwork from a PNGGet a PNG logo ready for screen printing. Trace it to one clean shape per ink color, split it into layers, and know what your printer still has to do.October 23, 2026 · 4 min read
- Maker workflowsHow to Make Cricut Stickers from a Photo or DrawingTurn a photo, drawing or logo into a cut-ready SVG for Cricut stickers. What to prepare, how to trace it, and how to avoid slow, messy cuts.October 26, 2026 · 2 min read